Thursday, 19 April 2012

if the credit card’s a-rockin’… somebody stop me, please!

Today’s post brought to you by Kelly

Somebody, please, take my credit card and hide it far, far away from me. It’s been on fire the last couple of weeks. I mean, we’re talking seriously hot. MELTING even. See, this is why I have to do the inexpensive DIY projects – I can’t afford to actually buy any more stuff, ‘cause I’ve spent all my money on other stuff ;-) Like…

I bought this vintage walnut dresser from Tribute Decor. As soon as I saw the picture, I had to have it. Mind you, I don’t have anywhere to put it, but why let that stop me? ;-)

dresser walnut

I love the shape, the grain of the wood, and the unusual drawer pulls. It’s all just so… sexy! This baby definitely WON’T be getting covered in chalk paint. Although I think I’m going to refinish it and give it a less orange & less glossy finish. And hubby wants to replace the legs with something chunkier. A few people have suggested using it as a bar in the eat-in end of our kitchen – maybe :-)

Last week, I discovered a new-to-me artist in Ottawa, Susan Bailie. It just so happens that she was in the midst of holding an art auction to raise money for a local restaurant, the Lindenhof – which is the place where hubby proposed with a pretend ring in a Kinderegg {long story for another time!}. So I had no choice, I had to bid on a painting {or two or three}. I’m now the happy owner of Wonderland 5 :-)

wonderland 5

Not only does Susan create awesome artwork, she also works her magic in home decor, creating amazing wall treatments. I’ll be posting an interview with Susan soon and there’s going to be a giveaway too, so stay tuned for that!

And speaking of art… my friend, abstract artist Matt LeBlanc, just finished painting a big & beautiful painting for my family room. He gave me the honour of naming her, with the one “rule” that the name could only be one word {that’s how Matt rolls!} After a lot of thinking and inventing weird words, I came up with the perfect name – AQUA. It’s the colour, it’s water, and words with Q in them are just cool :-)

Matt 1

I bought some great fabric in Toronto back in January {see, always shopping!} and Faye Fortune Drapery turned it into awesome valances for my family room. They’re just what I envisioned – thanks to Faye’s daughter Heather, who was able to figure out the look I was going for with all my non-technical terms and descriptions :-)

valance close upDoes the blue pleat look like a sailboat to you? Or am I just weird?

My glass float hobby has become a bit of an obsession – I just can’t get enough of them! I’m a bit of a stickler for buying only authentic working antique glass floats, but when I saw this baby at HomeSense for $39.99, I had no other option but to buy it. Really. If I’d walked away, it would have rolled off the shelf and followed me home.

big glass float 2

I’ve also got my eye on these beautiful authentic glass floats from lightinawormhole on Etsy. I really should narrow them down to my favourite two or three, but each of them is one-of-a-kind and when they’re gone, they’re gone. Which one(s) would you choose?

peridot iceblue nilecelestialchampagnenorthern lights

For those rare times that I’m not using my credit card, I need somewhere to put it. I picked up this teal leather purse at the Originals Craft Show a couple of weeks ago. It’s the perfect size and style, and I love the colour more and more every day :-)

purse

And to top off my crazy spending whirlwind, I just mailed off a deposit cheque to PEI this morning – we’re going to the ocean, baby! Well, OK, technically it’s the Northumberland Strait, but it’s a big body of water and we’re going to be living right beside it for a week with our dogs & flyball friends :-)

PEI sunset

OK, now I’m putting away my credit card and NOT using it again for at least a month! Right after sushi with the TBBs today at lunch. And after I decide which floats to buy. And… ;-)

kelly sig

Tuesday, 17 April 2012

{ let’s create } the diy mojo is a go-go

Today’s post brought to you by Kelly

It usually takes me forever to get projects done. I think I kind of psych myself out and get intimidated by all the things that I want to do and wondering how I’ll get them all done. Does that ever happen to you? But every now and then, the mojo kicks in and I get on a roll. And the last week and a half, the mojo kicked itself up a few notches and I got everything {plus more} that I wanted to do done, YAY!

These are the projects I told you about in my easter weekend DIY marathon post

1. Paint the front door – check

It took more coats than I thought, and there were the small issues of it not being warm enough some days and running out of paint with one coat to go. But the front door is now SW Oceanside. and I love it! Oceanside 2 Oceanside 4

2. DIY mercury glass – check

I showed you how I created DIY mercury glass in this post last week. My friend Maureen wondered if it’s  possible to make copper mercury glass. That set the wheels in motion, and I came up with this:

copper mercury glass 2 copper mercury glass

And with a candle:candle 3

3. Painted glass bottles – check

The fastest & easiest project – just swoosh around some acrylic paint and a little bit of water inside the bottle, and voila!

glass bottles

4. Homemade chalk paint – check

OMG, this paint is so cool. And it couldn’t be any easier to make. Combine 1/3 cup plaster of paris with 2/3 cup latex paint {I mixed a smaller amount by scaling down the proportions}. Add a tiny bit of warm water if the paint is too thick {but you do want it to be relatively thick }. Then go ahead and paint whatever it is you want to paint, no sanding or priming required. I had a wood candlestick that I was planning to give to the Salvation Army. I think I’m going to keep it now :-) Here it is painted with the chalk paint version of BM Chelsea Gray {the colour I painted my gallery wall} and sanded to distress the finish.

copper bowl candlestick

I rubbed on some Minwax Clear Paste Wax, buffed, and ended up with this.

candlestick

And one more recent project – this is the little personalized word art that I mentioned in my high street/low street post:

ocean breeze art 2

The best thing about all these projects is that they’re inexpensive & easy to do. And everything you need to make them is available at your local craft store, Dollar Store, and hardware store. What projects have you been working on lately? I’d love to see them!

kelly sig

Linking up to Wow Us Wednesdays at Savvy Southern Style

Sunday, 15 April 2012

{ let’s create } high street art at a low street price

Today’s post brought to you by Kelly

This is seriously one of the easiest and most inexpensive ways to create awesome original art. I was inspired by this beautiful piece that KariAnne at Thistlewood Farm made.

kerianne

And this was KariAnne’s inspiration – which costs £200 at Not On The High Street. WTF?! At that price, I’d hate to know what IS on the High Street! ;-)

kerianne inspiration

For a grand total of $4.00, my version is most definitely low street. And that’s fine with me, ‘cause I love it and it saved me about $396.00CDN :-)

the sea

Want to make one too? It’s easy! All you need is a canvas, stick-on letters {mine are from the Dollar Store}, and paint.

supplies

The hardest part {which really isn’t hard at all} is creating the “broken” heart shape, You want both sides of the heart to be pretty much symmetrical, and you have to make all the letters fit right. Once you’ve got that figured out, just stick on the letters and add a few coats of paint.

letters

I used a combination of grey & white paint and applied it on at an angle. Just ‘cause that’s how I roll :-) And that’s it! Told you it was easy ;-)

done 1

I’m probably going to glue this little starfish to the canvas. I just want to be absolutely sure it’s what I want to do before I commit! What do you think?

close-up

on mantel

I’ve got another little canvas with an ocean quote drying as we speak, and a 12” x 12” square canvas that’s going to be a little Mark Twain-esque… plus I have a whole whack of DIY projects I’ve been working on today to show you. Did I mention that homemade chalk paint is on my to-do list? Mmmm-hmmmm, I think I did… stay tuned!

kelly sig

Linking up to Five Days 5 Ways, DIY Project Parade, and

Friday, 13 April 2012

my new art-project love: { let’s create }

Post by: Victoria,ÉdinHome&Co

With so many projects on the go and lots of things to do in preparation for Scout Handmade + Vintage Market, I’ve done the absolutely reasonable thing… I’ve started a brand new project in a medium I’ve never used before! Speedball-Deluxe-Block-Printing-Kit

I might be obsessed!

I blame my brother Brad. What a guy!! He said to me, “Let’s do some block printing!” Off we go to the art store to purchase all the necessary materials and tools ~ lino blocks, a carving tool, a brayer (roller), ink, etc. What was I thinking?!

Well… I’ve decided that it just doesn’t matter because I so enjoyed carving my lino block. In fact, I can’t wait to do another!

I jumped into this new project by first creating a simple flower design that I then transferred to the lino block with carbon paper.

2012-04-12 15.36.11Next, I grabbed the blade and started carving!

My approach: everything I carved off of the block will not take the ink and so will be “white”, or the colour of the paper. Of course that means that everything not carved will be “black”, or what ever colour ink I choose to use. I decided to carve grooves into the background so that (hopefully) the occasional line will show in the background, creating a more dynamic look to the print.

I carved and fiddled, turning the block around in my hands again and again, and carved some more. Next thing I knew it was 2:30am and I was almost finished!

and… I was hooked on the process!!

I’ve since completed the block and this weekend I’ll be creating prints with it. How fun will that be?!

Here’s the finished lino block

2012-04-12 16.38.41

I’ll pull together a quick post in the next few days to show you the final result… promise! If the end product looks as good as I hope it will, I’ll include the prints as part of The Édin Collection (a product line I’m launching at the Scout Handmade & Vintage Market). Cross your fingers; mine are!!

Today, I’m off to buy more lino blocks! Hahaha!

Happy Friday!!

Signature 2[3]

Wednesday, 11 April 2012

{ let’s imagine } a beach-inspired front porch

image As I mentioned in this post last week, I decided to paint my front door {again!} a beautiful blue from Sherwin Williams called Oceanside. I decided to go all out and paint both sides of the door, seeing as the interior side was a bit banged up and needed a fresh coat of paint anyway. I did four coats on the interior side and was up to three coats on the exterior side before I ran out of paint and warm weather. Well, not stunningly warm – I needed temps of at least 10 Celsius, which didn’t happen on Monday or Tuesday. So the paint job is on hold till later this week when it warms up. I’ll post some pics when it’s all done.

In the meantime, I’m thinking about how to decorate the front porch this summer. I usually stick a bunch of impatiens and something tall into a planter and call it a day. But this year, I’m thinking of doing something with a beach theme – the door is Oceanside, after all :-) Although I’m really not sure what beach-themed planters look like. So I did some searching, and this is what I can up with.

This first planter would be easy enough to do, seeing as I already have a similar planter on the front porch. I love the wispy grass and the fact that the plants aren’t all bunched up together, so you can really see and appreciate the different colours, shapes, and textures. The driftwood is the perfect beachy touch, and I could put in one or two of my glass floats too.

beach-garden-pot sunset com photo rob d brodman Image via Sunset, photo by Rob D. Brodman

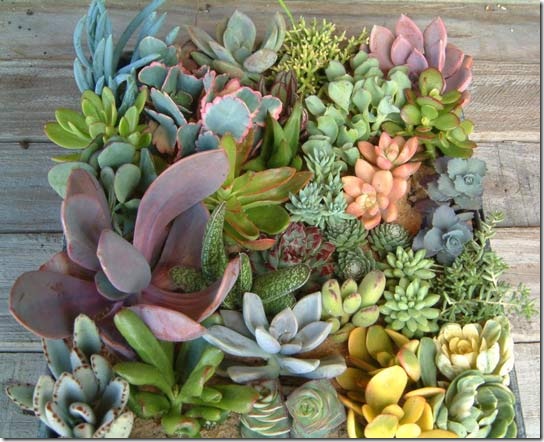
Succulents seem to be popular for beach-inspired planters. Hahaha! That reminds me of an exam I wrote back in University. One of the questions was “What is a succulent?” I had no idea {must have missed that class ;-) }, so I almost wrote “the guy sitting in front of me” {he was hot!}. But I decided on “a juicy steak” instead. Anyway… our porch faces south, so it gets a lot of sun over the summer – perfect for heat-loving plants that don’t need a whole lot of water.

succulent flickr Image via Flickr, photo by poppy2323

Love all the pretty colours in this succulent planter.

succulents apt therapyImage via Apartment Therapy

I wouldn’t do a cinder block wall, but I like the look of a group of single succulents in their own matching pots, maybe combined with some grasses.

SucculentWall zack benson photography 2Image via Zack Benson Photography

These little concrete planters from FMC Design in Montreal would be perfect.

FMC design

A couple of ideas for small-scale beachy planters with air plants.

air plant garden party flowers caImage via Garden Party Flowers

shell-air-plant completely coastal via beautiful detailsImage via Completely Coastal via Beautiful Details

This one literally puts the “beach” into a beach-inspired planter! Maybe not so much for my front porch, although the mini flip-flops are seriously cute!

beach in a pot Image via True Blue Me and You

Speaking of planters… I really like the look of square zinc planters, like these ones from Restoration Hardware. I’m hoping there are some crafty bloggers out there who have written tutorials on how to create DIY zinc planters, ‘cause the RH prices are just a bit too steep for me!

RH zinc footed planters I’m really looking forward to doing something different with the front porch this year. I’m pretty sure I’m going to combine wispy grasses and succulents. That means I’ll need to find a place inside to keep the succulents over the winter, but that should be easy enough to do.

Are you planning your summer gardens and planters yet? Do you do the same thing every year, or do you like to change things up?

kelly sig

Sunday, 8 April 2012

{ let’s create } diy mercury glass

with candle 1Making a List, Checking It Twice :  wedding schedule Checkli  DIY mercury glass is a project that’s been on my to-do list for a while… and now I can check it off, ‘cause the mercury glass is done! Woot! It was a fun and easy project – although my first attempt wasn’t as successful as I’d hoped.

There are a lot of DIY mercury glass tutorials out there that are really similar to each other, so I just picked a random one and ran with it. In a nutshell – spray five light coats of Krylon Looking Glass Paint onto the inside of a glass piece, waiting about a minute between each coat. Let dry for about 5-10 minutes after the last coat, then lightly spray a 50/50 mixture of water and vinegar onto the paint. Let sit for about 20 seconds, then rub with a damp paper towel to remove flakes of the paint, and voila, mercury glass. But my results weren’t exactly what I was hoping for… plus it took a LOT of elbow grease to rub the paint off.

star distressed  star distressed 2

So I decided to do my own thing to create the mercury glass look I was going for. I combined ideas from different tutorials, and came up with a technique that I think created a look that’s pretty close to real mercury glass…

mercury glass votive

Sorry about the lack of in-progress pictures – I was wearing gloves and getting paint all over myself and trying to go fast so I wouldn’t inhale too many fumes, so the camera just sat there watching and not actually taking pictures. But the process is easy…

What you need

  • Krylon Looking Glass Paint
  • 50/50 mixture of water and vinegar in a spray bottle
  • Glass piece with an opening large enough to fit your hand into {check out the Dollar Store}
  • Paper towels
  • Latex gloves

paint]  spray bottleglasses

How to do it

1. Lightly spray the water/vinegar mixture on the inside and outside of the glass piece, and then spray a thin coat of paint on the inside and outside of the glass piece. The instructions on the paint can say to spray it on the inside of the glass ONLY, but what can I say, I’m a rebel ;-) Painting both sides gives the piece a lot more depth. The paint is really thin and runny, so you really do have to go lightly with it. Let dry for about a minute. This is how it looks while it’s drying – not pretty, but don’t worry, it gets better!

vase in process

2. After letting dry for about a minute, put on your latex gloves and gently blot the paint & water with a paper towel. Blot, don’t rub – blotting will give you a mottled texture, rubbing will give you streaks. You won’t have much coverage at this point, but that’s OK – you want to build up layers of paint gradually.

vase close

3. Now it’s up to you to decide how much coverage you want. Keep spraying on light coats of the water/vinegar mixture and the paint, letting dry for about a minute after each application and then blotting with a paper towel until you achieve the look that you’re going for. Hold the glass piece up to a light to see how much coverage you have. I did the spraying/blotting process about six times to get the coverage that I wanted.

with candle 4

4. Once the coverage looks good to you, let the piece dry. You can still mottle the paint if you find there are spots where the paint is too solid. Wet a paper towel with vinegar and gently rub the spot in a circular motion. The paint will flake off – go slowly and don’t rub too hard, you don't want to rub all the paint off!

vae close d60

And just because I like to be different, I thought I’d try making a coloured mercury glass votive holder. I have lots of dye re-inker left over from the glitter balls I made for Christmas, so I used that. I squeezed in enough dye to cover the inside of the votive holder. It was pretty thick and didn’t swoosh around too well, so I spread it around with a paper towel and let it dry for about half an hour. Maybe I should have waited longer, but I was anxious to see if this was going to work :-) Then I followed the same process I used to create the mercury glass. Some more dye came off when I blotted, but there was enough left on the glass to give it a purple hue.

purple 2

votive d60Those are the coloured glass bottles in the background. Easy to make – pour in some paint, add a bit of water to make it thin enough to swoosh around inside the bottle, swoosh till the inside of bottle is covered with paint, turn upside to drain & dry, done!

three 1

three 2

votive close d60

with candle 7

And that’s how easy it is to create your own mercury glass :-) I’d love to create some more pieces, but my lungs need a break from the fumes! It would be better to do this project outside if you can, or at the least in a room with lots of good ventilation.

So what do you think – are you going to take a shot at making your own mercury glass?

kelly sig

Linking up to…

image 

five days five ways  feature friday free for all